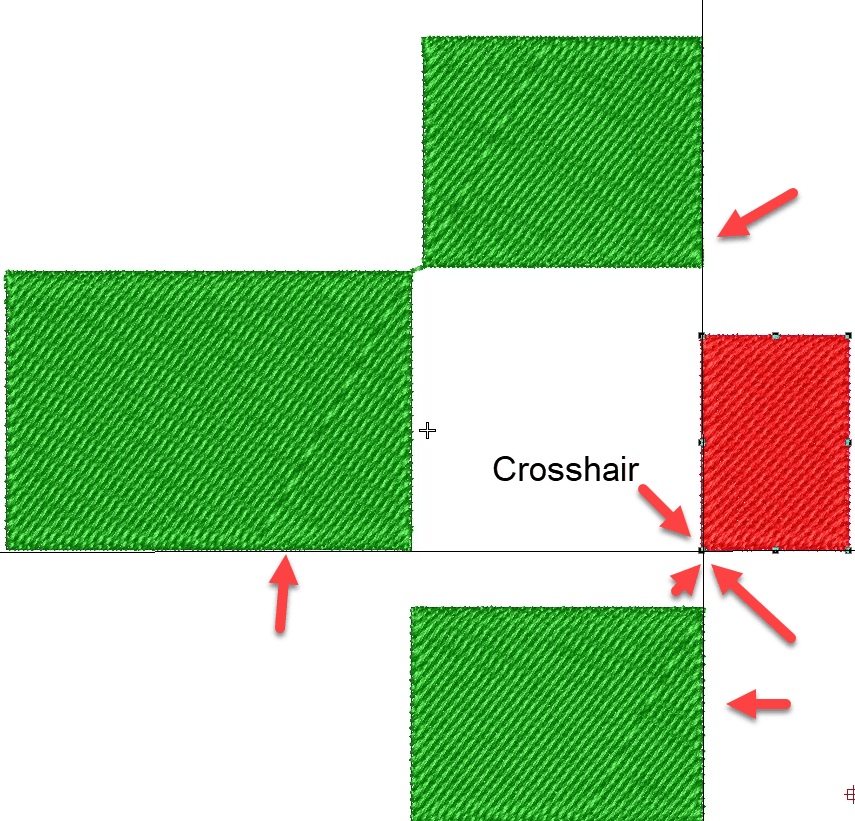
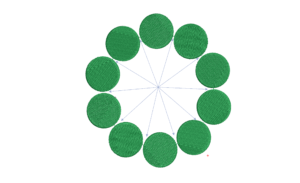
Breaking News

A First Look at EmbroideryStudio

To be successful at any endeavour a sound foundation of knowledge is essential. In this article and attached video I have “cherry picked” Menus and features that I think are the foundation to build the required knowledge and become a competent digitizer.
The list is not comprehensive but I think a good place to begin, I hope you enjoy and learn.

With any software a basic knowledge of navigating and understanding how and where to find settings and features is essential to becoming a success.

Manual

The age of the printed manual has long gone, an electronic manual is included in the software and includes many advantages including a FIND  button and easy navigation and of course the option to print all or part of the manual that is of particular interest to you.

Find in the HELP Menu

Manual Menu
Manual

Menu Window

At this early stage of your adventure into EmbroideryStudio 4.5G the most important feature here is displaying and hiding your toolbars.

Remember the shortcut here is to right click on a menu area.

Clicking to check the column to the left of the menu title will open or hide that menu.

Toolbar_Menu

Setup

There are 11 TABS in the Options Box that cover a variety fo settings including the Hoop settings,  Mouse scrolling limitations, Grids and Guidelines and others the area of focus for this article and attached video is the General Tab and then a selected few.

Setup_Options

Auto Save

The software will auto save your work as insurance in the event the software is closed down without warning. My suggestion is to choose the SAVE AS option from the file menu everytime you open a new work area. As you add to your design use the keyboard shortcut CTRL S  to save your design regularly.
However if you fail to do this the software will auto save and that auto saved file can be opened later  in the FILE MENU.

Open Backup

Closest Join

The Closest Join feature will move the start and finish points of consecutive objects as you digitize  to align them at the closest point.
The principal here is that if the points are close enough and there is no color change , then the machine will move from one object to another without stopping to trim.

You are able to determine the distance at which a trim does or does not occur in the CONNECTOR TAB, details of which are included in anther article.  See links below

Cross Hair Cursor

Crosshair Cursor

The cross hair cursor is a great tool to align previously digitized lines or points.

Measure Tool Tip

To measure between two points the keyboard shortcut is “M”
Selecting to display the  Tool Tip shows the distance and angle of the line measured.

Note:  Makes you wonder why it is an option 🙂

Measure Tool Tip

Inserting/ Importing an Embroidery File

emb files store the brand and color of thread in a design.

When inserting one emb file into another which uses a different brand of thread you have the option of importing the file with its original thread details or matching the threads to the palette of the file you are importing to.

Toolbars and Font List

If you have a high definition monitor you may wish to Name and enlarge the toolbar icons.

The font list details determine how many recently used fonts to display and the size to preview the fonts

Recent Fonts

Related Articles

Closest Join

We should all be aware of the closest join feature in Wilcom lettering. Did you know there is an automatic setting to adjust the start
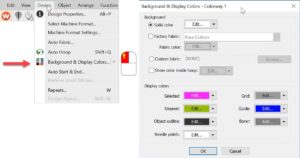
Read More »

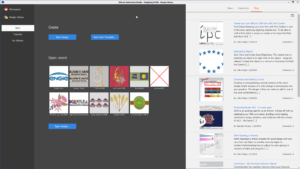
EmbroideryStudio 4.2 Home Screen

The soon-to-be-released EmbroideryStudio e4.2 introduces a new Home/Welcome Screen with handy links to Wilcom News, your Wilcom community where you can search for answers to
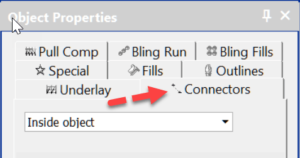
Read More »

Request for more articles

Leave a Reply

Your email address will not be published. Required fields are marked *